


How to Blend Your Blind into Different Environments
Your hunting blind is where patience meets precision, the space where you wait, focus, and finally take the shot. But if your blind stands out instead of blending in, all that effort can vanish in a second. Many hunters make simple but costly mistakes when setting up, from choosing the wrong location to ignoring camouflage details. Poor concealment can send deer and turkey running long before you even draw your bow.
At FUNHORUN, we understand that successful hunting starts with smart preparation. Our 360° blinds, like the Striker360 Elite Camo Ground Blind and Shadow360 Dualgate Pro, are built to keep you invisible, silent, and safe. In this guide, we’ll explain why many hunters struggle with blind concealment, and what savvy hunters do differently to master how to blend a ground blind, use natural camouflage for blinds, and improve hunting blind positioning and cover in every environment. This guide is for you.

The Basics of Blending a Ground Blind
Understanding concealment is key before setting up a hunting blind in any terrain. Pick a spot with good natural cover and look over the area to find well-used animal paths or feeding places. Watch how deer move at dawn and dusk to spot their usual trails, beds, or feeding spots, and mark these on a map or with GPS. Set up your blind about 5 to 10 yards from the main animal paths, and make sure it stays downwind of where animals will approach, so your scent isn't detected. Use existing bushes or tall grass to hide the blind and place it in dips in the ground or behind logs to break up its outline and keep it hidden.
Master brush-in techniques by weaving local vegetation such as grass, leaves, or vines into your blind’s loops. Keep it uneven and natural, avoid overloading. Choose natural camouflage for blinds that matches your surroundings. Products like FUNHORUN’s Shadow360 Dualgate Pro feature built-in brush loops for quick, realistic blending. Step back and test; if it disappears, you’ve done it right.
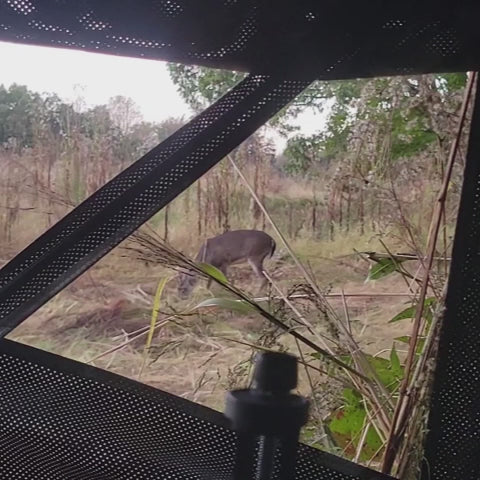
Blending Hunting Blinds in the Woods and Forests
Forested terrain offers natural cover but demands precision. To effectively hide your hunting blinds in the forest, place them up along tree lines, next to fallen logs, or in brush heaps where shadows naturally form. Pick camo that looks like tree bark or leaves and has vertical lines. Stay away from shiny materials that reflect sunlight. To make the blind look more genuine, add vines, branches, and leaves on top of it, paying special attention to the roofline to soften rough edges. For seasonal mixing, use dry leaves in the fall and new plants in the spring.
Eliminate shiny clips and exposed zippers, and check visibility from multiple angles. Setting your blind on level ground or slight depressions enhances its natural appearance. Pairing with decoys can also divert attention, helping your blind merge seamlessly with the forest.
Concealing Blinds in Open Fields
Blending in open fields is more challenging because cover is scarce, and your blind spot can stand out easily. To master concealing blinds in open fields, start by reducing your profile. Dig a shallow depression or use uneven terrain to lower the blind slightly below the horizon. Position it along crop lines, grassy edges, or near hay bales where its outline can naturally blend in. Weave in local materials such as straw, dried grass, or cornstalks into your blind’s loops. Adding a layer of burlap or field stubble gives extra realism and texture. You can also use DIY hunting blind camouflage ideas, such as scattering crop residue on the roof or placing decoys around the blind to break its symmetry.
Lighting and wind are critical in open areas. Avoid placing your blind where it casts long shadows or reflects sunlight, a south-facing position often minimizes glare. Wind direction should also guide your setup to keep your scent downwind. Before finalizing your position, walk at least 100 yards away and assess how well your blind spot blends into the environment. Adjust as needed until it disappears into the field’s natural texture.
Advanced DIY Ideas and Best Practices
Several DIY hunting blind camouflage options can help you hide even better if you like to personalize your gear. You may make your own netting using fabric remnants, raffia, or other natural fibers to give it a 3D look. Painting the outside of the blind with designs resembling bark or stone helps it blend well with its surroundings. If you want to set up a long-term hunting location, consider planting native grasses, such as switchgrass, or shrubs around it to provide year-round natural cover.
Maintenance is just as crucial as camouflage. After every hunt, clean your blind, check for wear, and promptly repair tears or faded fabric. Store it in a cool, dry place to prevent mildew and preserve color quality for added comfort and precision inside the blind. Above all, follow ethical practices, camouflage your blind, not your impact. Leave no trace and respect the environment you hunt in.
To blend your hunting blind well, you need to know how to do it, be patient, and be able to change. You can stay hidden and improve your chances of success by using brush-in methods, natural camouflage, and clever positioning on different types of terrain. A well-blended blind makes hunting much better, whether you're in thick forests, open countryside, or fields covered in snow, for hunters who seek the best, ready-to-use cover. Check out FUNHORUN's collection today. Once your blind is set up just right, all you have to do is take the shot.